This tutorial shows how to use the Contact Form 7 to Constant Contact plugin. The walk through contains instructions for using the form tag, hidden tags, and mapping the fields to Constant Contact.
The most important part of the process is ensuring your fields are mapped to the appropriate fields in your Constant Contact account. This way, any form field can be pushed over and added to your contact list data. In this tutorial, we'll cover both mapping fields and using the form tag.
If you use the Form Tag, this will either add a checkbox to your contact form, or an invisible opt in to the list you assign with the Form Tag generator. The alternative to this is to assign one or multiple lists using the Constant Contact "tab" in the Contact Form 7 form-generator. There are other options for this as well, and this is covered in the mapping fields section.
Using the Form Tag
The first step in building a contact form is to build the actual form. By now, you're probably familiar with the CF7 form generator. Within the form generator, there's a button called "Constant Contact". Using this button will allow you to add an optional checkbox, hidden opt-in, or multiple checkboxes to allow users to join multiple lists with a single form. Using the form tag is a good option when you want to add an optional subscribe checkbox to a regular contact form, product registration form, or other type of contact form that isn't explicitly for an opt-in. If you don't feel you need to do this, then you can skip to the mapping fields section.
Below is what the form-tag generator looks like.

- Name: This is the name of the tag. If you leave this blank, one will be created for you. You can use this to differentiate between multiple tags on a single form.
- Choose the list: Here you choose which of your contact lists you wish to add users to based on if they check the checkbox, or if you use the "Hidden Checkbox" option. The contact list ID is a long string with this version of the CTCT API. Just leave it in there as it appears.
- Checkbox Label: This is what text you want the checkbox to say. The default text is "Sign me up for your newsletter", so if you leave this blank, that is what will appear.
- Make Checkbox pre-checked: This is like it says. If you want the opt-in checkbox already checked, then check this.
- Hidden Checkbox: This makes the opt-in hidden. This can be handy if using multiple checkboxes, where one should be automatic no matter what. You can also use this in lieu of the setting field in the mapping fields tab.
- Class: This adds a CSS class to the wrapper on the form output. If you don't know what this means, then you probably don't need it.
- ID: This adds a custom CSS ID to the wrapper on the form.
- Insert Tag: When you're done. Click Insert Tag.
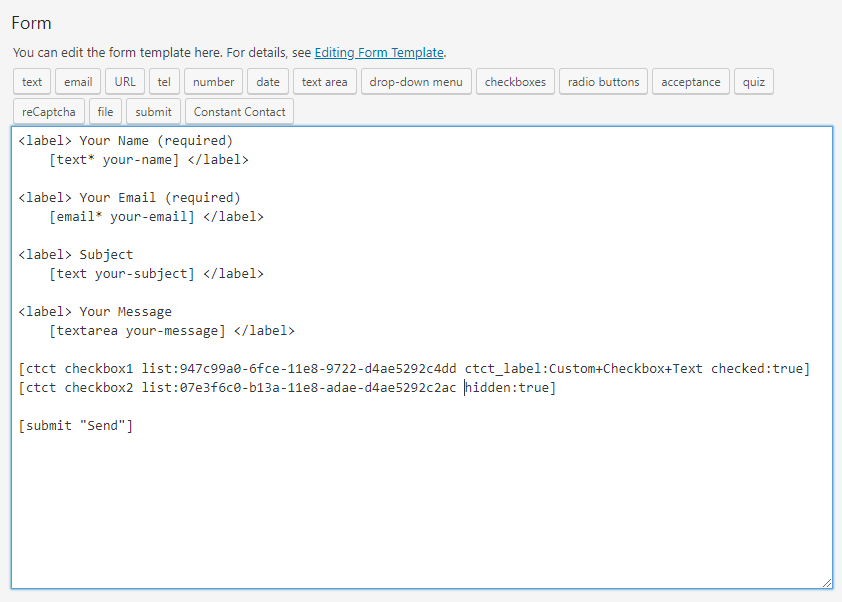 You can see in the above screenshot that multiple form tags are being used.
Mapping Fields
Mapping the fields through to Constant Contact required for this to whole thing to work. If you are actually connected to the API, and your contacts are not being pushed through to Constant Contact, it's most likely because this step got overlooked.
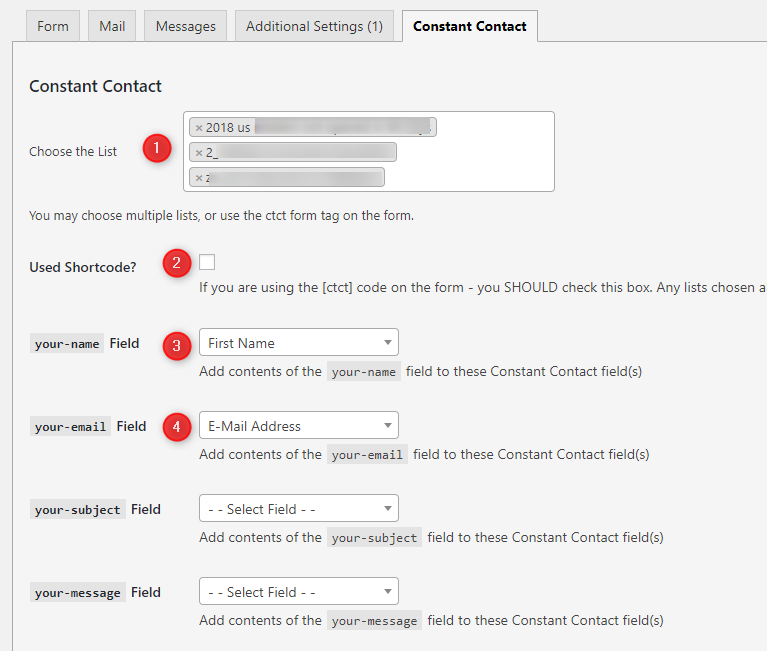
- Choose the List: In this area, it's a multi-checkbox where you can choose as many lists as you'd like. If you're using this to assign the list that the form pushes to you Constant Contact lists, then you do NOT need to put a form tag on the form itself. You ONLY need to put lists in here if you want to automatically subscribe your users to your lists without having to opt-in. This is good when you're using a form that is specifically a "sign up for our mailing list" form.
- Used Shortcode: If you don't need to use #1 because you did put a [ctct] form tag on the contact form, then be sure to check this box. It tells the plugin which to look at when processing the form, and determining which list(s) to send your contacts.
- Mapping Field: Simply match your form fields to the available Constant Contact fields in the dropdown. For the free version of the plugin, only simple contact fields are available. Name, Address, etc.
- E-Mail Field: (REQUIRED) - If you don't map an email address to the e-mail address field, your contacts will not get synced over to Constant Contact.

 We are available to work on your WordPress project. Custom development, themes and more.